

Soiree Rose
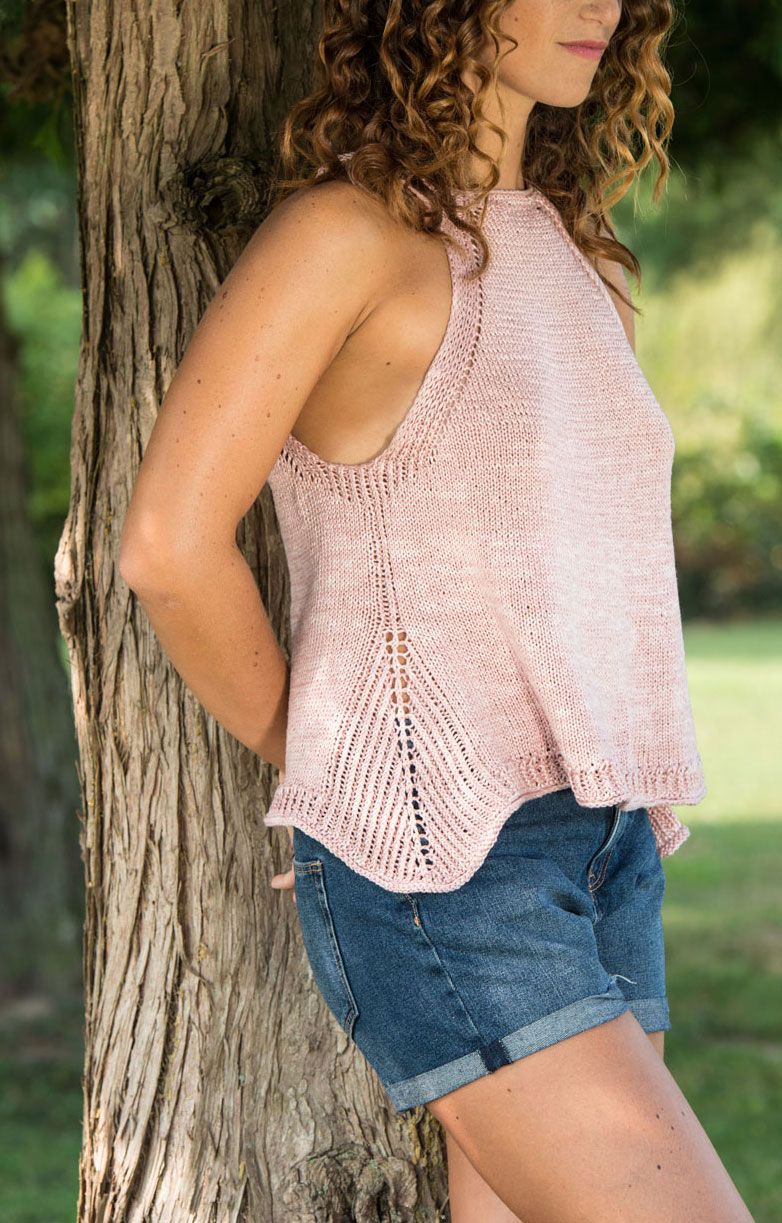
This top is made top-down from top to bottom. The first part is worked flat in back and forth needles, because the model is open on the back. Once the 2 pieces of the back and the front are finished, join the work in the round and continue in a circular pattern. The top is very low-cut, designed to be striking and bold. It ends with a pattern of increases, at the undersleeve, which create softness and amplitude.
m = stitch (e);
MP = point mark;
pMP = pass MP
LD = right side of the work
LR = wrong side of the piece
dr = straight;
r = reverse;
viv = edge;
2ins = 2 sts together knit
3ins = 3 sts together knit
acc = simple overlap: slip a stitch without knitting it, 1 dr, overlap the passed stitch over that worked.
get = one toss
rip ** =
repeat from * to *
K = knit, purl = purl, g = round; f = iron; dRt = straight twisted
1 get = thrown; 1 slip st = slip a stitch loosely with the yarn in front of the piece.
MP = point marker p MP = pass point marker
Size S = neck about 53 cm, armhole of the sleeve 22/23 cm, total length 53/54, but you can also make this longer, measure of the tip taken from the underarm about 35 cm.
Procedure
START with the needles n 3.5 stitches TG S 98 (TG M 110) work in return and return rows.
DDL 1st row = all straight
RDL 2 rows = full purl
DDL 3rd row = K 2, (* P1, K1 * x 2 times), 1rov, MP put 2 (4) K, MP put, (* P1, K1 * x 2 times), P1, 2
K, Put MP, P 16 (18), Put MP, K 2, (* P 1, K 1 * x 3 times), 1 v, Put MP, K 16 (20), K Put, (* P 1, 1 K * x 3 times), P 1, K 2, Put MP, P 16 (18), Put MP, K 2, (* P 1, K 1 * x 2 times), 1 v, Put MP 2 (4) dir , Put MP, (* P 1, K 1 * x 2 times), P 1, K 2.
RDL 4 rows = 2 sts pss, (* 1 k, 1 st sts * x 2 times), 1 k,
pMp, p to Mp, pMp, (* 1 k, 1 st pss * x 2 times), 1 k, 2 p, pMp, k up to Mp, pMp, 2 p, (* 1 k, 1 m pss * x 3 times), 1 k, pMp, p to MP, pMp, (* 1 dir, 1 m pss, * x 3 times), 1 k, 2 p, pMp, k to Mp, pMp, 2 p, (* 1 k, 1 m pss * x 2 times), 1 k, pMp, purl up to Mp, pMp, (* 1 k, 1 m pss * x 2 times), 1 k, 2 m pss.
DDL 5th row = K 2, (* P 1, K 1 * x 2 times), 1rov, pMp 2 (4) K, 1 get, pMp (* P 1, K 1 * x 2 times), P 1, 2 dir, pMp, 16 (18) pur, pMp, 2 dir, (* 1 pur, 1 dir * x 3 times), 1rov, pMp 1 get, straight and before Mp 1 get, pMp, (* 1 rov, 1 dir * x 3 times), 1 pur, 2 dir, pMp, 16 (18) pur, pMp, 2 dir, (* 1 pur, 1 dir * x 2 times), 1rov, pMp 1 get, 2 (4) dir , pMp, (* P 1, K 1 * x 2 times), P 1, K 2, RDL 6 rows = same as 4 row
DDL 7th row = K2, (* P1, K1 * x 2 times), 1rov, pMp, straight and before MP 1 get, pmp (* P1, K1 * x 2 times), P1, 2 dir, SUSPEND THESE LINKS ON A THREAD (leave the stitch markers dividing the edges)
REMOVE MP which was from the shoulder, softly close the 16/18 stitches up to MP, REMOVE MP, 2 k, (* 1 p, 1 k * x 3 times), 1rov, pMp 1 get, straight and before Mp 1 get , pMp, (* P1, K1 * x 3 times), P1, K2, HANGING THESE STITCHES ON A THREAD (leave the stitch markers dividing the edges)
REMOVE MP which was from the shoulder, softly close the 16/18 stitches up to MP, REMOVE MP, 2 k, (* 1 p, 1 k * x 2 times), 1rov, pMp 1 get, then all straight, pMp, ( * P 1, K 1 * x 2 times), P 1, K 2,
NOW WE WORK ONLY ON THIS PART WHICH IS THE BACK LEFT:
RDL 1 f = 2 m pss, (* 1 dir, 1 m pss * x 2 times), 1 dir, pMp, rov up to Mp, pMp, (* 1 dir, 1 m pss * x 2 times), 1 dir , 2 sts pss, DDL 2nd row = K 2, (* P 1, K 1 * x 2 times), 1rov, pMp 1 get, then straight, pMp, (* P 1, K 1 * x 2 times), P 1, K 2, Repeat the 1st and 2nd row for another 22 (TG M 24/26)
RDL 1 f = 2 m pss, (* 1 dir, 1 m pss * x 2 times), 1 dir, pMp, rov up to Mp, pMp, (* 1 dir, 1 m pss * x 2 times), 1 dir , 2 m pss,
DDL 2nd row = K 2, (* P 1, K 1 * x 2 times), 1rov, pMp 1 get, then straight and BEFORE MP 1 get, pMp, (* P 1, K 1 * x 2 times) , P1, K2, REPEAT the 1st and 2nd row 2 more times,) the sleeve armhole must measure from the EDGE at least 22/23 cm, then PUT THESE LINKS IN SOPSESO ON A THREAD, leave the MPs that divide the edges.
NOW put the other back on the needle behind the RIGHT one, start with a new thread, AND START on the wrong side. FOR
insert the new thread you can purl the first 2 stitches.
ONLY FOR THIS IRON, afterwards they always pass as explained below.
STARTING FROM THE REVERSE OF THE WORK
RDL 1 f = 2 m pss, (* 1 dir, 1 m pss * x 2 times), 1 dir, pMp, rov up to Mp, pMp, (* 1 dir, 1 m pss * x 2 times), 1 dir , 2
st pss, DDL 2nd row = K 2, (* P 1, K 1 * x 2 times), 1 v, straight knit and BEFORE Mp 1 get, mp, (* P 1, K 1 * x 2 times), 1 P, K 2, repeat the 1st and 2nd row for another 22 (TG M 24/26) then:
RDL 1 f = 2 m pss, (* 1 dir, 1 m pss * x 2 times), 1 dir, pMp, rov up to Mp, pMp, (* 1 dir, 1 m pss * x 2 times), 1 dir , 2 m pss,
DDL 2nd row = K 2, (* P 1, K 1 * x 2 times), 1rov, pMp 1 get, then straight and BEFORE MP 1 get, pMp, (* P 1, K 1 * x 2 times) , P 1, K 2, repeat the 1st and 2nd row 2 more times, the sleeve armhole must measure from the EDGE at least 22/23 cm then PUT THESE STITCHES IN SOPSESO ON A THREAD (leave the stitch markers that divide the edges )
NOW put the FRONT back on the needle, start with a new yarn, starting from the wrong side. TO insert the new yarn you can purl the first 2 stitches.
ONLY FOR THIS IRON, afterwards they always pass as explained below.
RDL 1 f = 2 m pss, (* 1 dir, 1 m pss * x 3 times), 1 dir, pMp, rov up to Mp, pMp, (* 1 dir, 1 m pss * x 3 times), 1 dir , 2 sts pss, DDL 2nd row = K 2, (* P 1, K 1 * x 3 times), 1rov, pMp 1 get, straight and BEFORE Mp 1 get, pMp, (* P 1, K 1 * x 3 times), P 1, K 2, repeat the 1st and 2nd row another 24 (24 Tg M) times. The armhole sleeve must measure at least 22/23 cm from the EDGE
INSTRUCTIONS FOR INCREASING THE WIDTH OF THE FRONT:
My model made with these increases measures a maximum of 34 cm, if you want to make it a little wider you can
make some increases as you go. In this case the increases must be central, like 8 stitches after the yarn over and 8 stitches before the other yarn over, here you have to use these increases M1s = increase, with the tip of the right needle lift the yarn that passes between one stitch and the the other and put it on the left needle so you can work it twisted taking it on the back M1d = increase, with the tip of the right needle lift the thread that passes between one stitch and the other and put it on the left needle so that you can work it on the front First the M1s then the M1d every 4 ROWS.
NOW YOU NEED TO JOIN THE WORK IN THE ROUND, we have the front stitches on the needle.
To be able to join you must have the work on the right hand straight.
IT PROCEEDS FROM HERE:
REPLACE 7 (9) stitches, (to assemble PUT ON THE BACK OF THE PIECE, then get back on the right side and attach the front with the LEFT side (which you will have previously placed on a needle) continuing to work the ribs as they appear, starting with 1 purl, up to first MP.
PMp, straight up to MP, pMp, (* P1, K1 * x 2 times), 1rov, now WORK the last 2 stitches, knit, crossing them with the first two of the RIGHT BACK (as if you were making a braid) PUT MP at the center of the intersection, (NOW WORK IN THE ROUND, and this will be the MP of your END OF LAP)
Continue to work rib stitches up to MP, MPp, straight up to MP, pmp, (* P 1, K 1 * x 3 times) REPLACE 7 (9) stitches, (to fit PUT ON THE WRAP, then get back on the forehand and attack the right side with
the front, NOW WORK THE SHIRTS AS THEY PRESENT, starting with 1 purl, work in RIB, the ones that are already set, THE UNDERLINER SHIRTS ARE ALSO WORKED THOSE IN RIBBED 1/1 BY FIXING THEM WITH THE OTHER ALREADY PRESENT.
Then WORK as it appears up to END OF ROUND 1 ROUND = 2 k, * 1 p, 1 knit TWISTED * from * to * x 2 times), 1 k, remove MP then straight up to Mp, remove MP, 2 k, * P 1, K 1 TWISTED * from * to * up to 2 stitches before MP, then K 2, remove MP, straight up to Mp, remove MP, K 2, * P 1, K 1 TWISTED * from * to * up to 2 stitches before MP then K 2, remove MP, then straight up to Mp, remove MP, K 2, P 1, K 1 TWISTED, P 1, K 2 END OF ROUND 2 ROUND = work as the stitches appear. 3 ROUND and subsequent rounds until you have done about 15 cm, work like this = work as the stitches appear, always make 1 purl and 1 straight twisted LESS ON EACH SIDE, of all the ribbed parts, so as to do everything in SHIRT SHIRT, EXCEPT THE 3 STITCHES IN THE CENTER OF THE UNDER-SHIRT which must be kept 1 purl, 1 knit twisted, 1 purl.
AFTER these CM 15 in stockinette stitch you start to increase the underarm.
INSTRUCTIONS TO CREATE THE SIDE PATTERN, you must do it in correspondence with both underarms:
Highlight the 3 stitches with 2 Mp, In these stitches the pattern is created, on the rest of the vest continue to SHINED STITCH BETWEEN THE MARKERS = 1 p, 1 get, 1 k twisted, 1 get, 1 p.
Next round P 1, K 1, K 1 twisted, K 1, P 1 are worked.
Next round = P1, K1 twisted, K1 get, K1 twisted, K1 get, K1 twisted, K1 twist.
Next round = P 1, K 1 twisted, K 1, K 1 twisted, K 1, K 1 twisted, P 1.
Next round = P 1, K 1 twisted, P 1, K 1 get, K 1 twisted, K 1 get, P 1, K 1 twisted, P 1.
Continue making the central increases 1 ROUND YES and 1 ROUND NO, P RIB 1, K 1 twisted as the stitches increase, until you have 16 more stitches on each side. (TOTAL increases 32)
Then you start the edge.
EDGE
You work on the whole ribbed tank top 1 purl 1 straight TWISTED, ENCLOSING THE SIDES WITH THE SIDES already in rib, continue to increase the sides, so until you have 20 more stitches per side.
(TOTAL increases 40)
Then FINISH ON THE ENTIRE TANK with One turn to REVERSE Two turns to STRAIGHT.
CLOSE SOFTLY. Make a flying buttonhole at the top on the right side, put 1 button
On the left side. If you prefer you can also put more buttons.